How To Translate Datasets in Luzmo with Google's Cloud Translation API

Have you ever wrestled with providing multilingual data and dashboards to customers? Then you know it can be a real pain! Today, however, personalizing your SaaS app has become table stakes. And in an increasingly globalized world, breaking language barriers is often part of the game.
Luckily, offering dashboards and data in multiple languages is no longer difficult or time-consuming, thanks to machine learning and AI translation tools. In this tutorial, you’ll learn how to translate datasets efficiently and automatically, using a Node.js script. We’ll walk you through all the steps along with code examples.
To help you navigate this article, here are the main take-aways we'll discuss.
- Why translate your data?
- Why use AI for translation?
- Code tutorial: translate datasets with AI step by step
- Additional tips for translation projects
Need to skip ahead to a specific step in the code tutorial? Use the quick links below:
- Step 1: retrieving the data
- Step 2: translating the data
- Step 3: updating and storing the translated data
- Useful links and resources
If you want to dive into the code immediately without reading the article, skip straight ahead to the GitHub repo: luzmo-official/dataset-translation
Picture this: you have been building a successful e-commerce store for the past 5 years in your home country. You’re starting to see demand from all over the world, and are working with more international suppliers.
Imagine how much you could boost international business if you’d translate all product details, the checkout experience, and the customer chatbot into your customer’s language. You’d be reaching even more people, creating more trust, and sending your sales and engagement through the roof.
The same goes for reports and dashboards in your SaaS app. For non-technical users, using data to make decisions can feel a little intimidating, especially if the interface is in a different language. With translated datasets and dashboards, your global product users feel right at home. Besides improving the user experience, high-quality translations can also drastically impact your revenue streams.
- If your app is only available in English, automated translation will help you acquire more users in new regions.
- If your app is already available in multiple languages, but your reporting dashboards aren’t, you can finally roll out this feature to new users and boost upsell.
No AI translation software can translate as fluently and accurately as a skilled translator. However, most growing SaaS companies don’t have the budget and resources to employ human translators to localize their apps and dashboards. Nor is it the most cost-effective approach, especially if you want to translate millions of data points into French, Japanese, Chinese, German, Portuguese, Spanish, and more.
To grow your product fast without compromising on a localized experience, artificial intelligence can automate the heavy lifting. If you’ve tried ChatGPT for document translation, you’ll know how easy it is to translate a short and simple source text. And with specialized translation platforms or APIs, you can start translating data at scale!
In this tutorial, you’ll use Google Translation AI to automate and drastically speed up the translation process. Google’s translation services use neural networks and neural machine translation to deliver high-quality translations in less time and for a fraction of the cost of human translation.
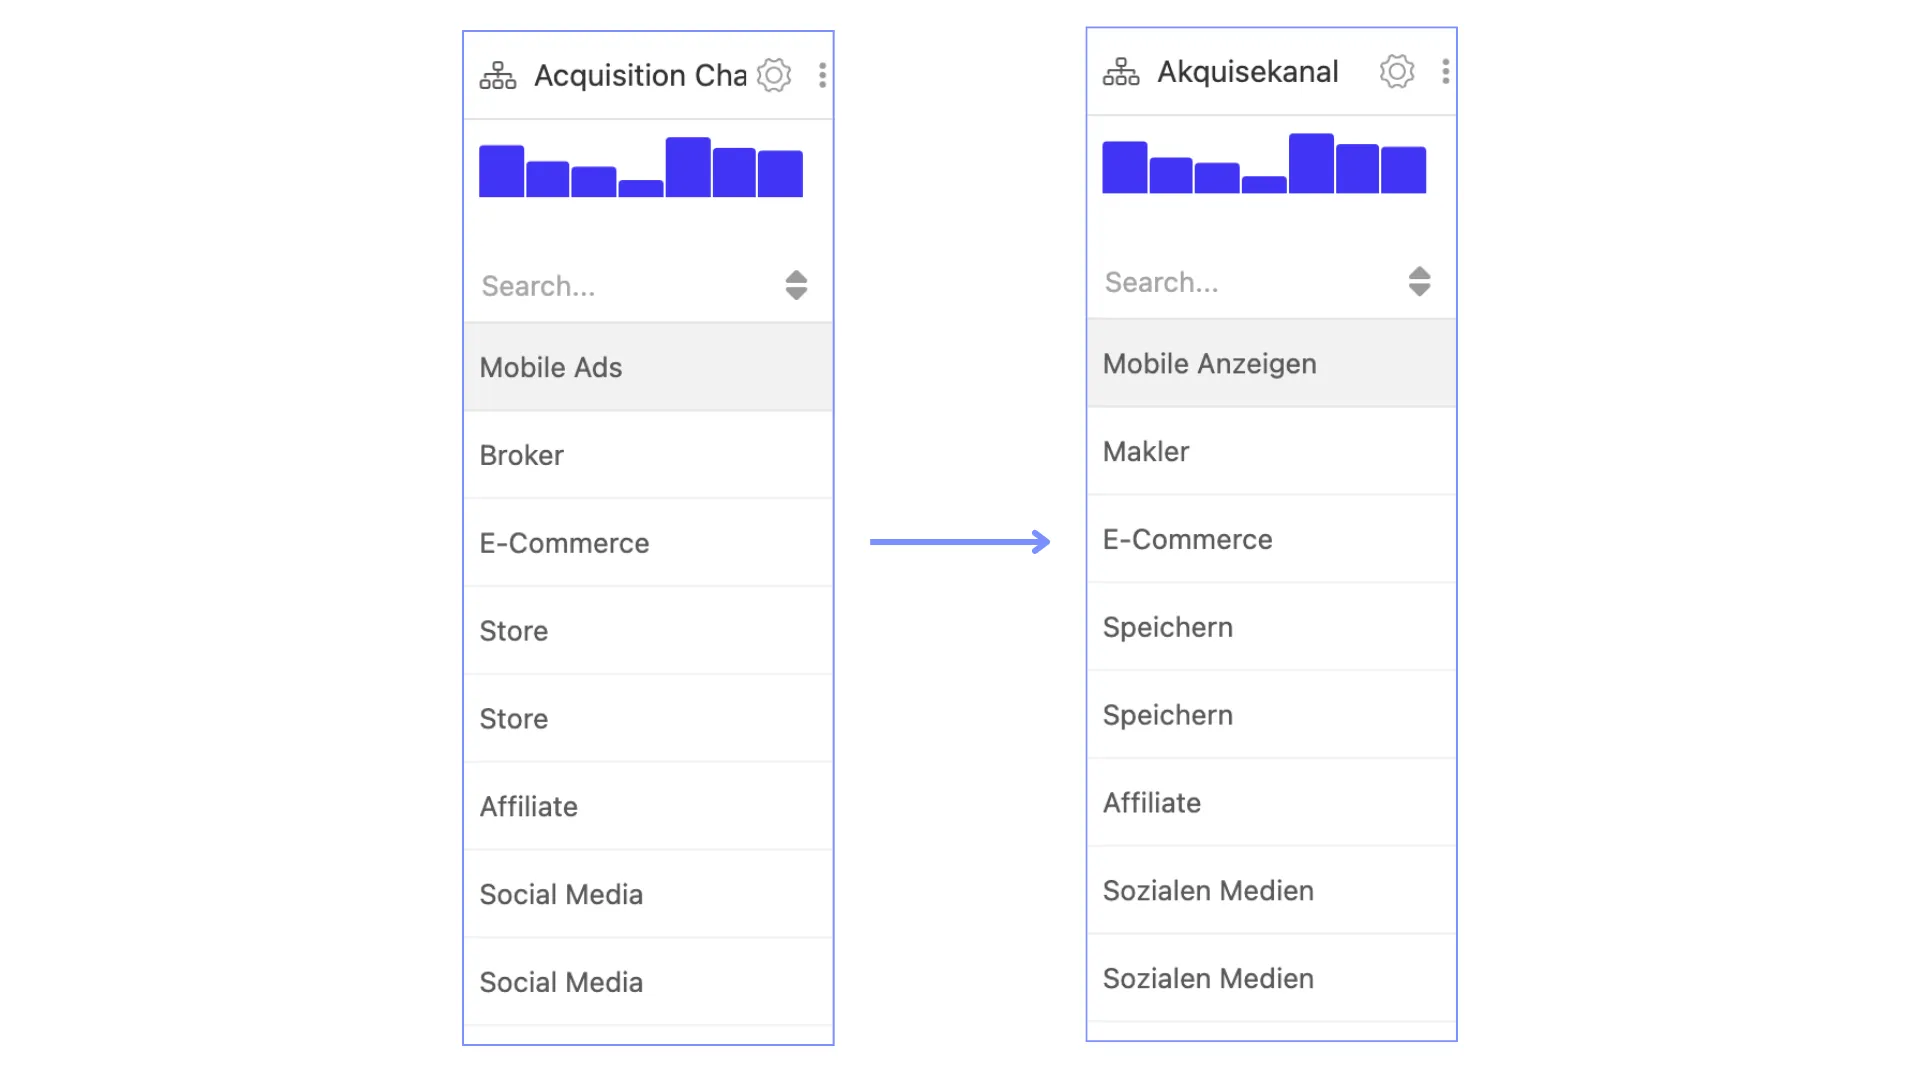
In this tutorial, you’ll learn how to translate the data of any dataset into multiple languages. We’ll be translating a dummy customer dataset from English to German, but you can run the script with any dataset, in any language of choice! Here's a quick glimpse at the end-result.
With the resulting datasets, you’ll be able to build multilingual dashboards, automatically showing data in your product user’s language. We won’t cover the steps of creating the dashboards and translating the dashboard metadata today, but stay tuned for a separate tutorial on this topic!
To get AI-powered translations up and running, you’ll be following three simple steps.
Retrieving the data: In this step, you’ll retrieve the data from your dataset. In this example, we’ll use a sample dataset from Luzmo, an embedded analytics platform for SaaS, containing dummy customer data. However, you can use any local file (e.g. CSV, JSON, spreadsheet), or a dataset from any database or API, and follow the same steps.
Translating the data: For the sake of simplicity, we’ll use Google’s machine translation services: Cloud Translation API. But there are many other great AI translation technologies you can use that might fit your use case better, such as Lokalise, translate.com, Microsoft translator, and Deepl.
Storing the translated data and metadata: This is an important step, because it’s essential to always keep your data and translations up-to-date. Instead of storing a copy of the data, you’ll want to store the translation and a link to the original data. This way, your users will always see the latest data. Luzmo provides an easy way to store multilingual data, so we’ll feed the translations back into Luzmo.
Without further ado, let’s jump into the tutorial! Before we demonstrate how you can translate a dataset and keep the translations up-to-date, you’ll first need a proper setup.
Installations
Let’s first create a directory for this project in which we will keep our files.
These lines of code let you initialize npm in the directory and install several Node.js libraries and packages using the npm package manager.
Set up the npm package & fill in the details.
Now install the dependencies.
We will use ES6 modules, so add the following line to your package.json file.
In this example, we will use a demo dataset provided by Luzmo. This dataset contains customer data, such as personal information, customer segment and acquisition source. But as we mentioned, you can also use your own local files, database tables or API’s.
If you do not have an account on Luzmo yet, you can grab a free 10-day trial here (no credit card required).
Once you’re logged in, let’s start with connecting the data source. Navigate to the overview pages, click on Datasets and add a dataset.
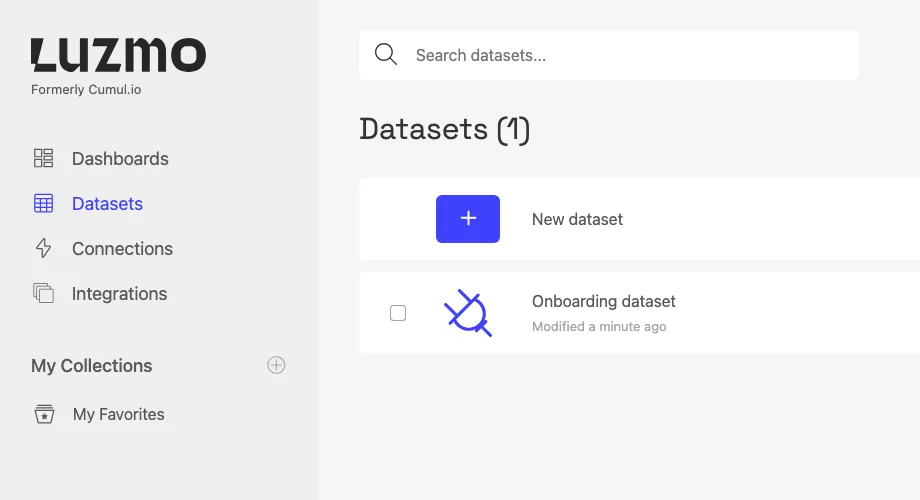
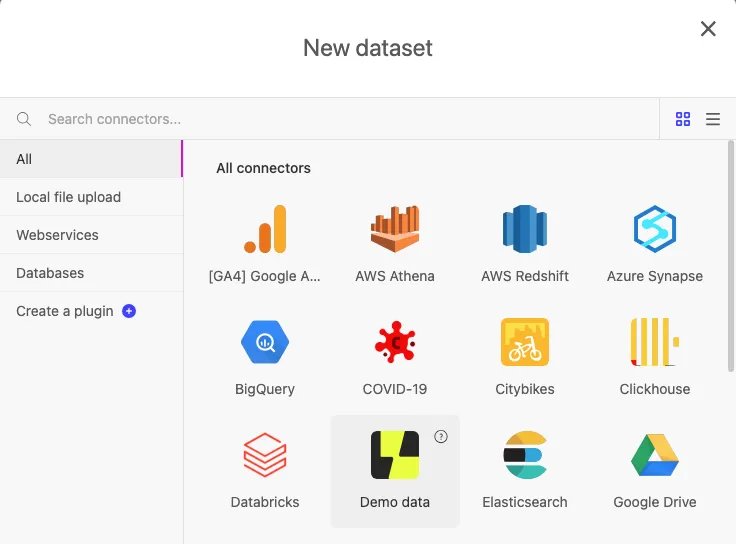
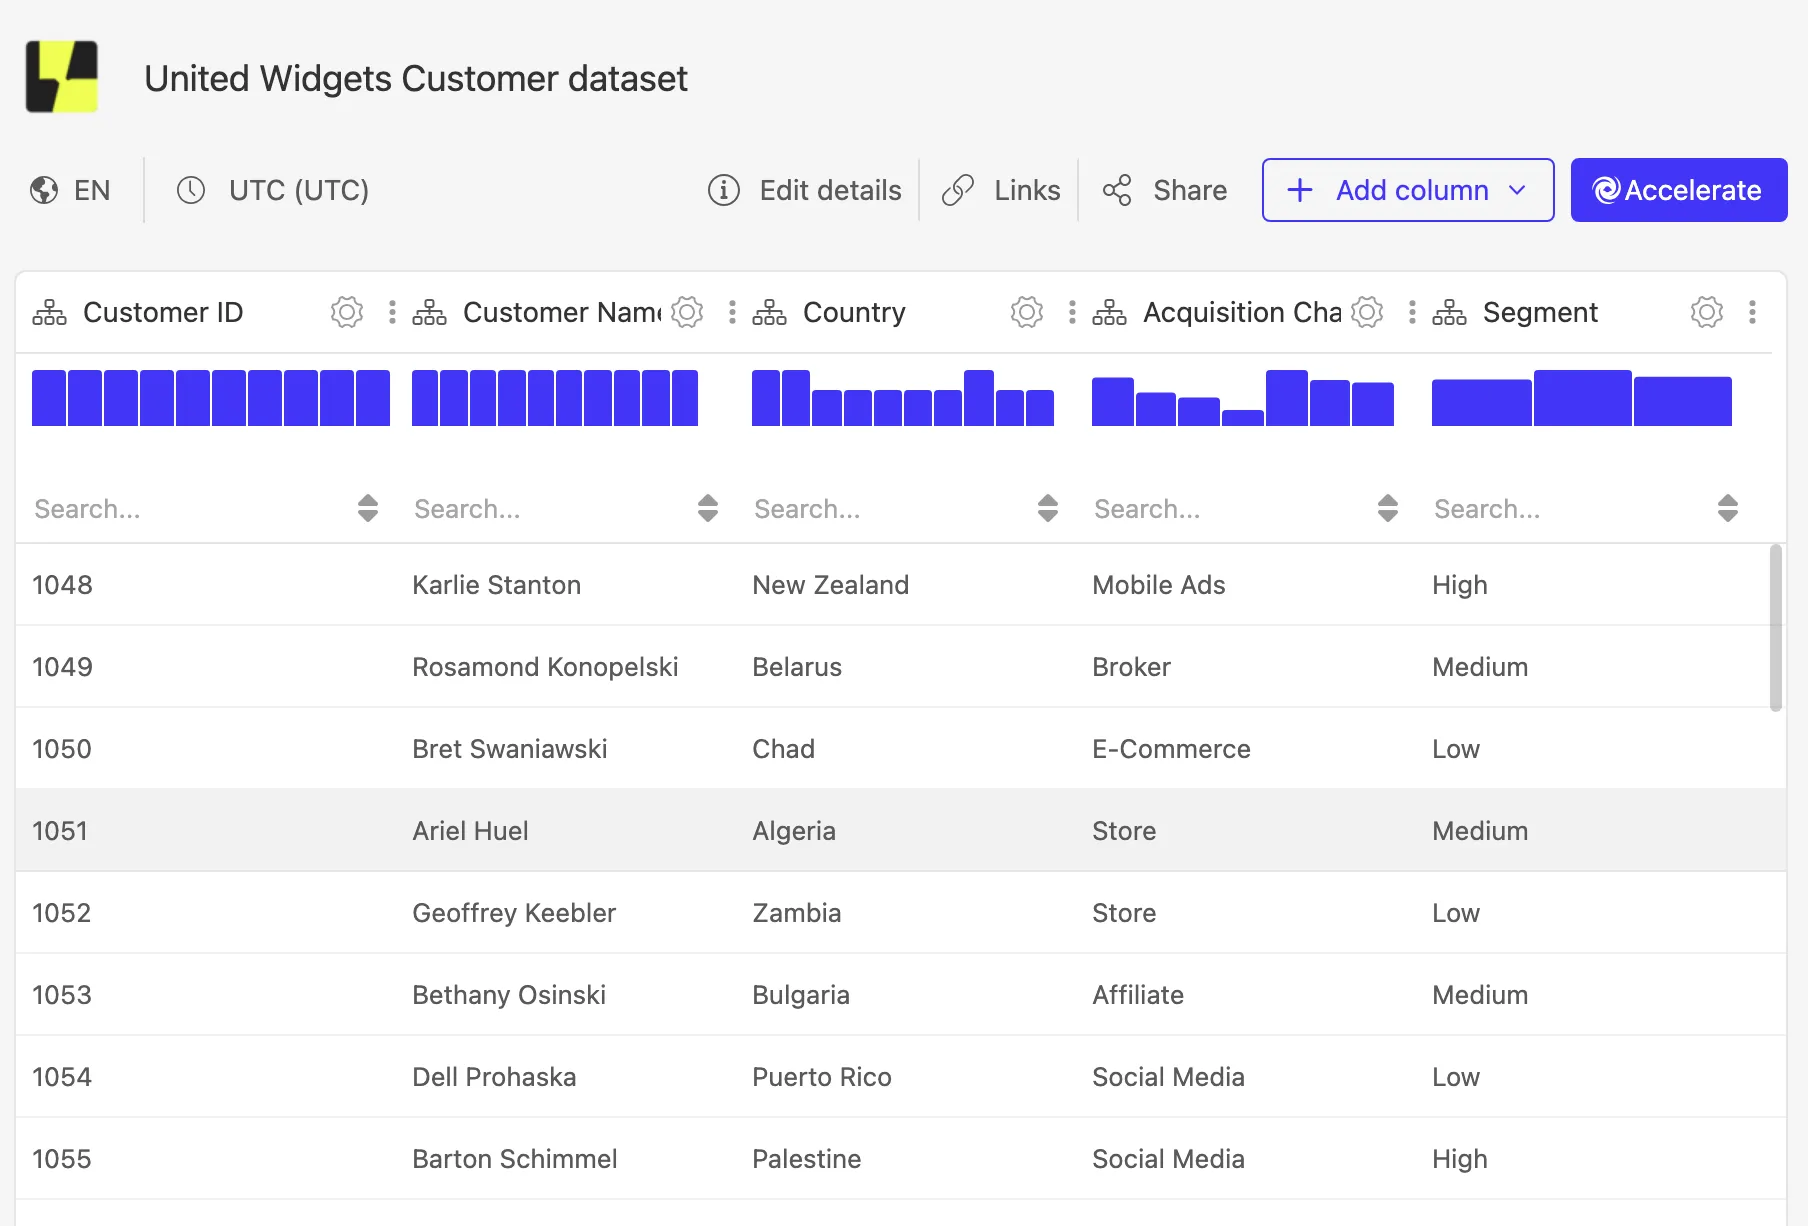
Choose the Demo data connector and import the United Widgets customer dataset.
Open the dataset. It contains a number of columns that we will want to translate:
- Gender
- Country
- Acquisition channel
- Segment
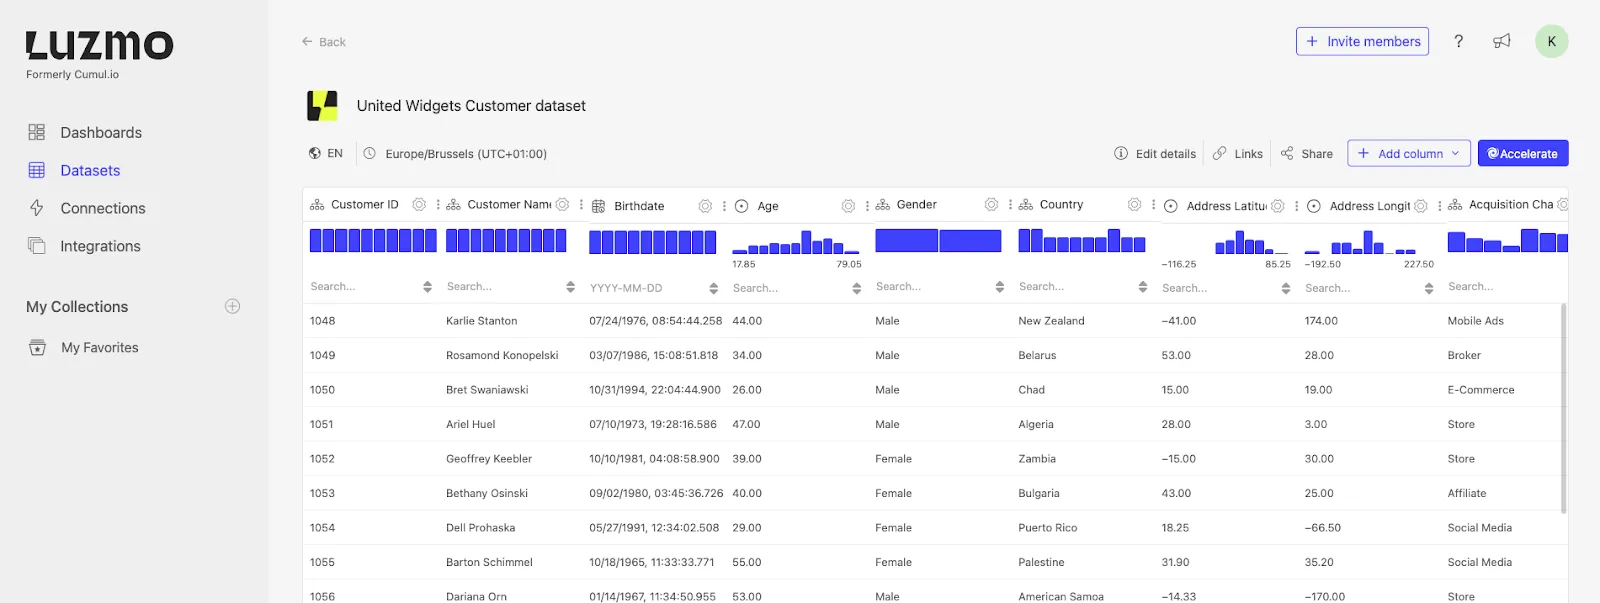
Besides the data in the columns, we will also want to translate the metadata of our dataset. By metadata, we mean the dataset name, the description and the column names. This will be important to ensure that language is consistent everywhere.
Now that we have the data, let’s start to fetch it in our node script.
Create a file called luzmo.js, in which we will keep all the logic of retrieving and updating data and metadata.
Let’s go over the code piece by piece.
We’ll start by initializing the Luzmo client. We need this to be able to retrieve the data and metadata from the dataset. We are using the ‘dotenv’ package to retrieve the key and token from a separate .env file. For security reasons, we will keep our credentials separate from the code in this file!
To be able to query the data from your Luzmo account, create an API key and token and store the contents in a file named ‘.env’ in the following structure.
Now, your Luzmo client will be able to fetch the necessary data and metadata. Let’s have a quick look at the other parts.
With the code below, we’re exporting a getDataset function that we can use to fetch all the metadata of the dataset we want to translate. Since we only want to translate the dataset name, description, and column names, we’ll limit the code specifically to these attributes.
In the function below, we are retrieving the unique values per column. Here, we don’t want to query the entire dataset but only the unique values per column. This approach will limit the amount of translations needed and save us a huge amount of time and network traffic.
OK, we have our retrieval functions ready! Let’s try to run it. Create an index.js file, which will serve as a coordinator file using the functions we have just created.
Important: fill in the IDs for your specific dataset. You can do this by opening the dataset in the application. Your URL will have the following format:
Copy the dataset ID into the index file.
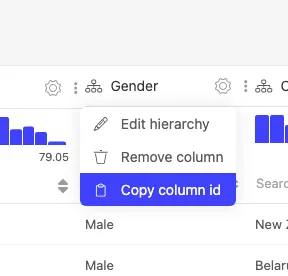
To fetch the column IDs, click on the cog icon next to the column name. Copy the column ID to the list of column IDs in your index file.
That’s it! You are ready to run the code.
Run it by typing node index.js in the terminal, in the directory we have just created.
If all goes according to plan, you should see a first success! You can now see the metadata you’ve retrieved from your dataset and the individual column values that we want to translate! We’re ready to dive into the translations now.
In this section, we’ll translate the retrieved data from English to German. We’re using the Cloud Translation API services for this.
If you don’t have an account yet, don’t worry. We’ll guide you through the steps and you’ll be settled in no time. If you already have an account and a credentials file, you can skip the steps below.
Creating a service account and retrieving a credentials file
At the time of writing, Google is offering $300 credit for free. To run this example, you’ll only need a couple of cents. Getting your credential files takes a couple of steps, but if you follow the explanation, you’ll be there in no time.
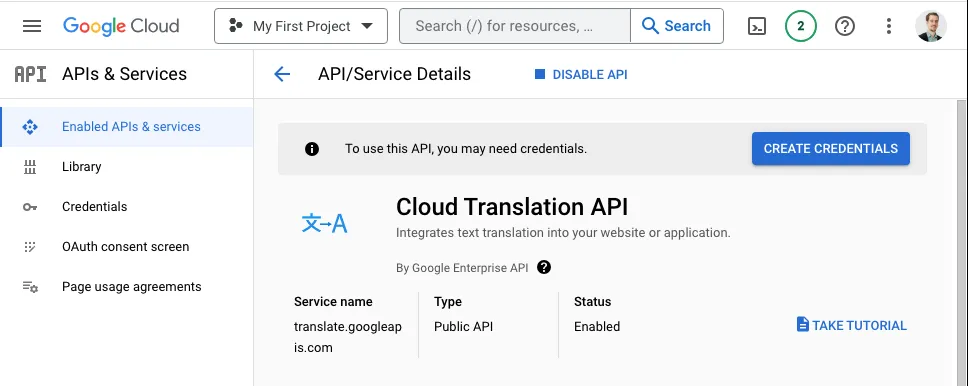
Let’s start with the account creation on Google Cloud. If you do not have an account, create one here. Once you have created your account and are logged in, visit find the Cloud Translation API page on their marketplace and enable the Cloud Translation API.
When you have the Cloud Translation API enabled, let’s create some credentials.
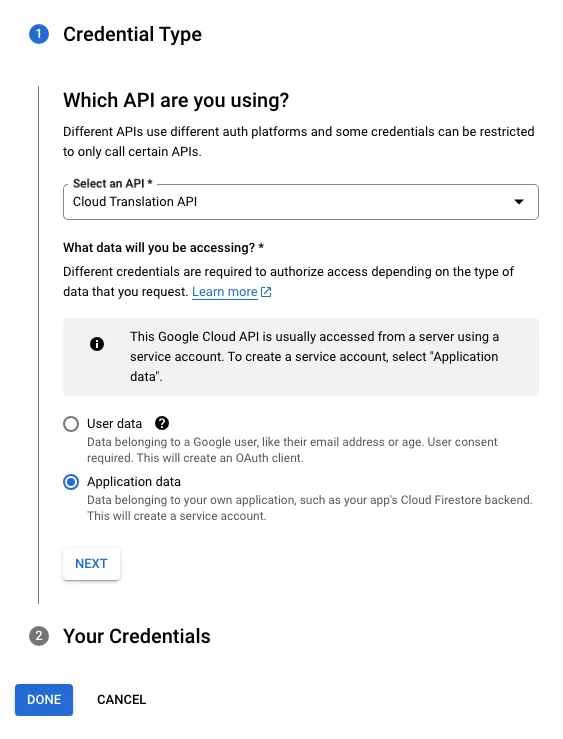
Click on Create Credentials. On the following screen, make sure you select The Cloud translation API and choose ‘Application data’ in the form below.
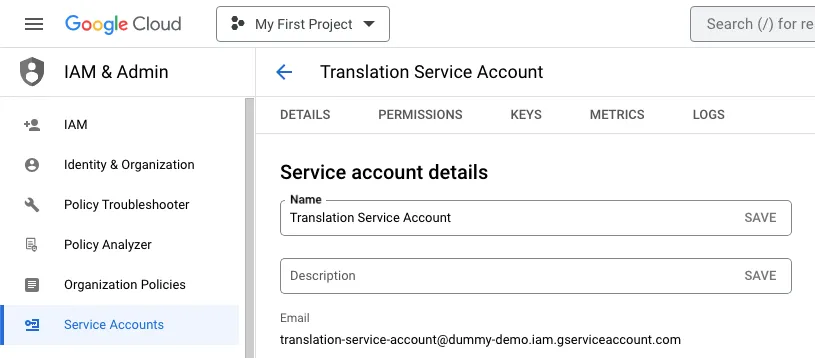
Click next, and fill in the name for the Service Account. A Service account ID will be generated from that name.
Click on Create and continue. You can leave the next screens as they are and click Continue, and Done when you’re ready. Your service account is now created.
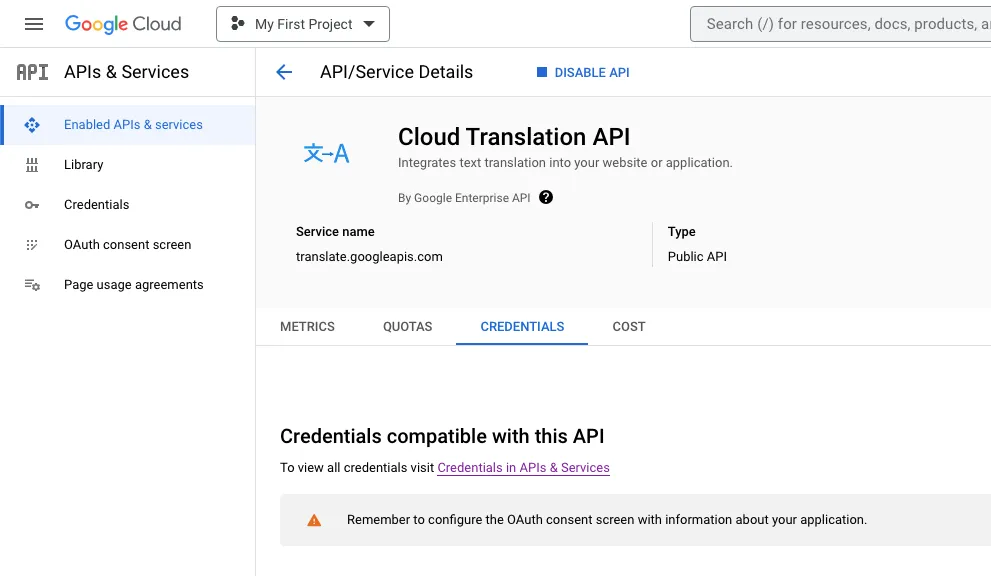
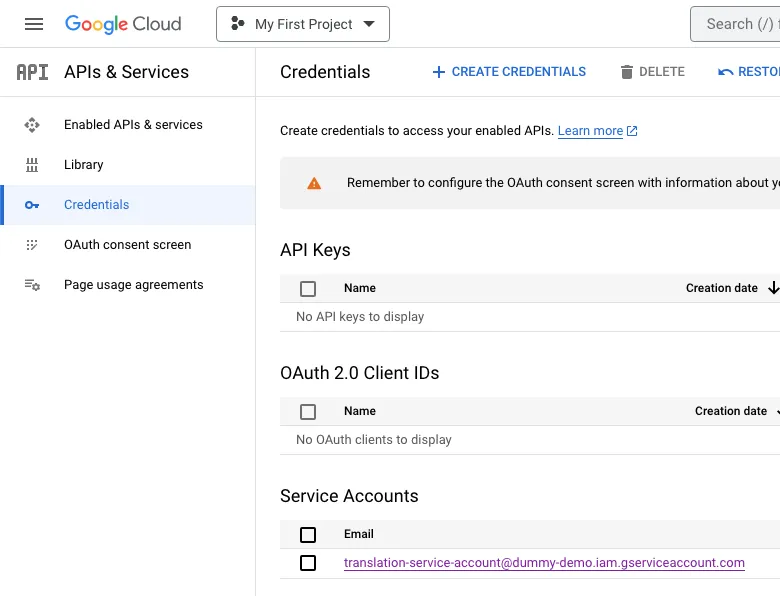
Let’s now create the credentials file. Click on Credentials.
Open the service account you just created. Yours will be named differently than the one you see on the screenshot.
Click on Keys and then on Add key -> Create New Key.
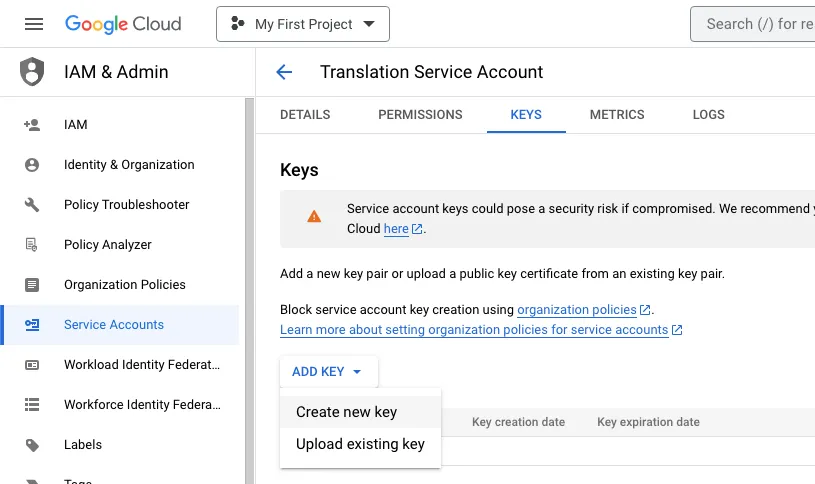
Choose the JSON format and click Create. This should download a JSON file. Copy that JSON file into the root of our project directory and rename the file to: ‘translation-api-credentials.json’.
⚠️ This file contains the credentials we will use to access the Cloud Translation API, so handle it with care and do not expose the file. For good practice, you will see that our final repository includes the filename in the .gitignore file to avoid it being committed. So, if you are starting from the repository you will need to place the file in the root folder.
Now that we have that settled, the fun part begins: using the Translation API!
The translation function
Create a file called google-translate.js, in which we will keep all the logic for translating the data.
Let’s go over the code piece by piece.
Here, we start with the setup of the Google Translation Service client. First, we import the credentials file. Using the credentials file we created above, we set up the translation service.
Then, we expose a translateValues function that takes in a list of values to translate and a target language.
The translateText function that the Google Cloud Translation API offers expects an input object with the following keys:
- parent: this uses the project_id in your credentials to identify where the request is coming from
- contents: the values we want to translate as an array
- mimeType: given it is just text translation, we chose ‘text/plain’ here but if you are using html code, you can also use ‘text/html’
- sourceLanguageCode: The source language, in this case ‘en’ for English
- targetLanguageCode: The target language to which we want to translate
There are many more possibilities in configuring the Cloud Translation API responses, including different translation models and glossaries, but for this example, the default behavior suffices.
We create a translateValues function that takes an array of values and a target language as arguments. It uses the translateText function to perform the translation work. The response we treat as we are only interested in the translatedText values.
Translating the actual values
Now that we have exposed the function, let’s wire what we have together in our index.js file.
First, import the translateValues function, and perform the translations at the end.
For the sake of clarity, we translate the dataset name, description, column names and column values separately.
If all goes well, you will now see the translated results. The Cloud Translation API returns an object, but we are only interested in the translatedText value.
To store the translated data and metadata in Luzmo, we’ll add two more functions to the luzmo.js helper file.
These functions are pretty straightforward: we use the Luzmo API to send the translated information back and store it.
Interesting to know here is that Luzmo uses a concept of ‘hierarchies.’ Hierarchies let you create data structures with multiple levels, but also store translations of data and seamlessly switch between languages in a dashboard or dataset.
Now that we have the helper functions ready, let’s write our translated values back into Luzmo. We’ll do that in our final index.js file. The full index.js file now looks like this.
Let’s look at some code snippets here to explain what is happening.
In the first snippet, we create a new object that adds the translated dataset name and description to the existing name and description object. It sends the update to Luzmo.
We do the same thing for every column name in the next snippet.
In the last snippet, we translate the actual data.
In the snippet above, you see we use a very specific structure when we update the data. To understand why, you first need to know that in Luzmo, next to having multilingual labels, you can also add ‘hierarchies’ as metadata to your actual data. This means you can group your data in different levels by using hierarchies. For example, if you have a dataset column ‘Store name’ that contains a list of stores, you could create a new level that groups the stores by type of store: brick & mortar or e-commerce.
In this example, we don’t need to use levels. Therefore, we set the attributes to:
- Virtual: false => this means we are not adding a new virtual value (that could act as a level)
- trace : ['_$root', value.id] => Given we don’t use levels, you data is just 1 level down from root level
- level : 1 => Set as 1, given we don’t use levels
- subTreeLevel: 0 => Set as 0, given we don’t use levels
Once we have created this structure, we can add the translate value to that structure using the same index, because Cloud Translation API translates in the exact same order as the input values.
And there you have it: Your dataset metadata and the actual data points are translated and ready to use.
Your original dataset in English

The translated dataset in German
If you now want to translate to Italian instead of German, just run it again but with the input value ‘it’. It’s that simple, go wild and go global!
Handling quality assurance (QA)
AI translation solutions can turn weeks of translation work into mere minutes. But taking the output for granted would be a huge mistake. Although translation engines can streamline your translation workflows, make sure you let a qualified translator or native speaker on your team review the translations.
The best method for QA is to mimic how your customers will use it. Configure a Luzmo dashboard that uses the translated dataset, so you can toggle between languages in real-time. You’ll easily spot any discrepancies or nuanced errors caused by automated translation.
If your dataset uses specialized jargon or content, it’s worth looking into more advanced features in Google’s translation AI, such as glossaries or custom-trained language models. You can predefine specific terminology in a glossary to get accurate translations from the outset. Although it’s beyond the scope of this post, using custom models trained on specific text helps you deal better with unique linguistic and domain-specific requirements.
Handling updates
When new data gets added to your dataset, you don’t want to translate the entire dataset all over again. Instead, we recommend filtering out unique values, translating only the new ones, and adding them to your existing translations.
But how frequently should you update your translations? It depends on how often new data gets added. If updates are regular and manageable, translate right after. If not, set up a scheduled job based on your data volume. Just know that your dashboard keeps running, showing untranslated values until you get around to translating them. It's your call on what suits you best for staying updated.
If everything went well, you’ve successfully translated your dataset and its metadata, congrats! Although it’s only the beginning, it’s a crucial step toward making your data accessible to a global audience.
Now that you have data in multiple languages, the next step is to bring that data to life in multilingual dashboards. In the upcoming installment, we'll dive into creating and translating dashboards, and how to embed them into your SaaS app. Stay tuned for part 2, where we'll guide you through the process of creating multilingual, user-friendly dashboards that transcend language barriers.
To wrap up, here are some resources from this tutorial you might find useful:
Written by

Luzmo
Ship the future of your data
Let us show you what Luzmo can do for your product.

Leave your e-mail and one of our analytics experts will reach out to you